Quite a few of the clients I have worked with lately have asked about implementing Gated Content. Not Gated Pages – preventing access to pages requiring an account and roles but gated areas on an actual page. Essentially requiring a site visitor to give up some information about themselves before gaining access to some content.
This actually a good thing in Sitecore because we can request the visitor’s email address so that we can identify them in xDB. Meaning more and more of our Site visitors will be uniquely identified, tracked and ultimately targeted with personalised experiences.
Implementing Levelled Gated Content in Sitecore
https://marketplace.sitecore.net/Modules/G/Gated_Content
So how would we actually implement that in Sitecore? Let’s go through the user experience of gated content first.
A visitor comes to the site and navigates to a page that holds some valuable content – a white paper, imagery, text etc. The content is not presented, however, a form is displayed requesting some information about themselves. After providing that information the content is displayed to that user and they shouldn’t see the form on subsequent visits.
But let’s make things a bit tasty. Let’s say the client is keen for information so wants to dripfeed content to get more and more information out of the visitor. We’re talking about Leveled Gated Access. E.g. providing an Email gets gains you access to Level 1 gated content, but if you want to see Level 2 gated content you’re gonna have to give up your gender and age. Then ultimately your soul.
Anyways. Let’s talk about this Module, starting with the form.
Custom WFFM Save Action
The form could be custom code but it makes much more sense to use Sitecore’s Webforms for Marketers. Allowing the Content Editors to control the fields on the form.
So we need to extend WFFM so that on submission of the form the user is marked as granted access to gated content. The version 1 of this module simply uses a cookie against the browser to outline that the User has provided the required information.
This file contains bidirectional Unicode text that may be interpreted or compiled differently than what appears below. To review, open the file in an editor that reveals hidden Unicode characters.
Learn more about bidirectional Unicode characters
| public class GrantGatedAccess : WffmSaveAction | |
| { | |
| public override void Execute(ID formId, AdaptedResultList adaptedFields, ActionCallContext actionCallContext = null, | |
| params object[] data) | |
| { | |
| HttpCookie cookie = new HttpCookie(Constants.GatedAccessCookeName) | |
| { | |
| Value = Constants.AccessGrantedCookieValue, | |
| Expires = DateTime.Now.AddDays(Utility.GetCookieLifeSpan()) | |
| }; | |
| HttpContext.Current.Response.Cookies.Add(cookie); | |
| } | |
| private Utility _utility; | |
| public Utility Utility | |
| { | |
| get | |
| { | |
| if (_utility == null) | |
| { | |
| _utility = new Utility(); | |
| } | |
| return _utility; | |
| } | |
| set { _utility = value; } | |
| } | |
| } |
The lifespan of the cookie can be controlled in a setting in the config file of this module. Also, if you wish you use a different naming convention for the cookies you can provide your own Utilities class to do so.
To achieve the Levelling of Gated Access the module includes a second Save Action class, which marks the level of gated access the visitor can access. The Module ships with Level 1 and Level 2 but you can easily create any number of levels by copying the Save Action Item and updating the Parameter field with a new level.
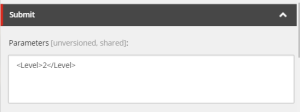
The GrantLevelledGatedAccess Save Action differs from the previous GrantGatedAccess by retrieving the Level from the Parameters field and storing it in the value of the cookie.
Then its a matter of adding the Save Action from the Module to the form you want to use for gated content. E.g.
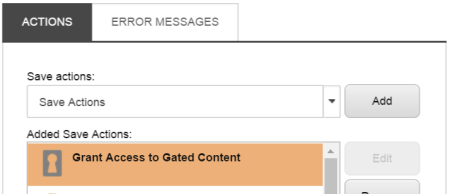
Ultimately, I have envisage the GrantLevelledGatedAccess can check the level the visitor is allowed to view. Whereas the GreantGatedAccess just checks if they have been granted access regardless of a level. They both use the same cookie. Both have value to a Content Editor.
Sitecore Rules for Gated Content
Now that we have a way to mark the visitor as being granted access to gated content we need to handle the dynamic showing / hiding of the form and the content itself. Sitecore’s rules engine and personalization are perfect for this.
The module ships with two new Sitecore personalization rules. The first, Grant Gated Access checks if the visitor has been granted gated access regardless of its level.
This file contains bidirectional Unicode text that may be interpreted or compiled differently than what appears below. To review, open the file in an editor that reveals hidden Unicode characters.
Learn more about bidirectional Unicode characters
| public class GrantGatedAccessCondition<T> : IntegerComparisonCondition<T> where T : RuleContext | |
| { | |
| protected override bool Execute(T ruleContext) | |
| { | |
| string cookieName = Utility.DefineCookieName(); | |
| if (HttpContext.Current.Request.Cookies[cookieName] == null) | |
| return false; | |
| var actualVal = HttpContext.Current.Request.Cookies[cookieName].Value; | |
| if (String.IsNullOrEmpty(actualVal)) | |
| return false; | |
| return true; | |
| } | |
| private Utility _utility; | |
| public Utility Utility | |
| { | |
| get | |
| { | |
| if (_utility == null) | |
| { | |
| _utility = new Utility(); | |
| } | |
| return _utility; | |
| } | |
| set { _utility = value; } | |
| } | |
| } |
The rule is available for selection in the rules engine
![]()
The Levelled condition varies by letting the Content Editor set the gated level through the rules interface. The rule also allows conditional operators so the Content Editor can use logic like Gated Access Level must be equal to 3 or Gated Access Level must be equal to or greater than 2. Here’s the implementation.
This file contains bidirectional Unicode text that may be interpreted or compiled differently than what appears below. To review, open the file in an editor that reveals hidden Unicode characters.
Learn more about bidirectional Unicode characters
| public class GrantGatedAccessLevelledCondition<T> : IntegerComparisonCondition<T> where T : RuleContext | |
| { | |
| public int No { get; set; } | |
| … | |
| protected override bool Execute(T ruleContext) | |
| { | |
| string cookieName = Utility.DefineCookieName(); | |
| if (HttpContext.Current.Request.Cookies[cookieName] == null) | |
| return false; | |
| var actualLevel = HttpContext.Current.Request.Cookies[cookieName].Value; | |
| if (string.IsNullOrEmpty(actualLevel)) | |
| return false; | |
| int actualLevelInt; | |
| if (!int.TryParse(actualLevel, out actualLevelInt)) | |
| return false; | |
| Value = No; | |
| return Compare(actualLevelInt); | |
| } | |
| } |
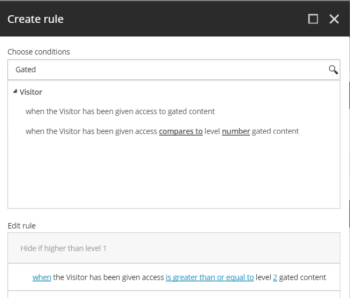
Putting those Sitecore Personalization rules to use will achieve the dynamically hiding the form when the visitor has provided the required information as well as displaying the content (e.g. an image gallery, download links etc).
It can be set up so the form component is swapped for the content component. I.e. the form will be hidden and the content is shown when the user has the right gated access level.
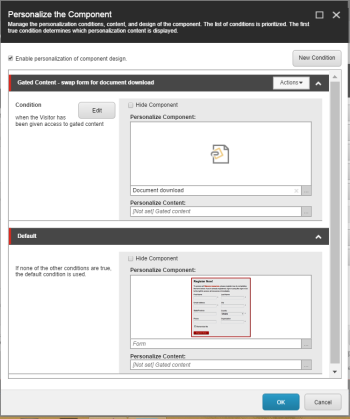
This works great for visitors who previously filled out the form – they will never see the form and will have access to the Content immediately. However, visitors who just submitted the form will not see the content immediately after pressing the submit button as the personalization rule runs on the page initialise. The user will need to refresh the page to view their content. That’s a bit crap so I’ve made the Module help them out with that.
Custom Success Action Pipeline processor
The SuccessAction pipeline is executed when a valid successful submission occurs. I want to hook into that pipeline towards the end as to not break the existing processors. But it must be before the SuccessRedirect processor occurs which redirects the User to a Success Page (if the Content Editor has set one for the form). We still want to support Success Pages so we just need to factor it in.
The processor is pretty simple, redirecting the user to the current page so that the personalisation rules are run. However, we have two conditions. If the Form has a Success Page set up the processor must honour it by letting the subsequent processors execute. The Form must also have a Gated Content Save Action, i.e. the whole purpose of the reload, determined by the Save Action Id being present. If both conditions are met, we fresh the page.
This file contains bidirectional Unicode text that may be interpreted or compiled differently than what appears below. To review, open the file in an editor that reveals hidden Unicode characters.
Learn more about bidirectional Unicode characters
| public class SuccessGatedContentRedirect : ClientPipelineArgs | |
| { | |
| private List<string> _gatedContentSaveActionIds = new List<string>(); | |
| public void Process(SubmitSuccessArgs args) | |
| { | |
| Assert.IsNotNull((object)args, "args"); | |
| if (args.Form != null && !args.Form.SuccessRedirect && FormHasGrantGatedAccessSaveAction(args))) | |
| { | |
| string urlString = HttpContext.Current.Request.Url.AbsoluteUri; | |
| WebUtil.Redirect(urlString, true); | |
| } | |
| } | |
| private bool FormHasGrantGatedAccessSaveAction(SubmitSuccessArgs args) | |
| { | |
| bool isGatedForm = false; | |
| foreach (string gatedContentSaveActionId in _gatedContentSaveActionIds) | |
| { | |
| isGatedForm = args.Form.SaveActions.ToLower().Trim().Contains(gatedContentSaveActionId.Trim().ToLower()); | |
| if (isGatedForm) | |
| break; | |
| } | |
| return isGatedForm; | |
| } | |
| public void AddGatedContentSaveActionIds(XmlNode configNode) | |
| { | |
| Assert.ArgumentNotNull(configNode, "configNode"); | |
| string attributeValue = XmlUtil.GetAttribute("value", configNode); | |
| _gatedContentSaveActionIds.Add(attributeValue); | |
| } | |
| } |
As you may have noticed I’m pulling in the Id of the Gated Content Save Action from config. This supports you adding any number of Levelled Gated Access Save.
This file contains bidirectional Unicode text that may be interpreted or compiled differently than what appears below. To review, open the file in an editor that reveals hidden Unicode characters.
Learn more about bidirectional Unicode characters
| <configuration xmlns:patch="http://www.sitecore.net/xmlconfig/"> | |
| <sitecore> | |
| <settings> | |
| <setting name="CookieLifeSpanInDays" value="1000" /> | |
| </settings> | |
| <pipelines> | |
| <successAction> | |
| <!– Replace the Success Redirect of WFFM to reload the page if a Gated Content Form –> | |
| <processor patch:before="*[@type='Sitecore.Form.Core.Pipelines.FormSubmit.SuccessRedirect, Sitecore.Forms.Core']" | |
| type="JonathanRobbins.GatedContent.Pipelines.SuccessAction.SuccessGatedAccessRedirect, JonathanRobbins.GatedContent"> | |
| <GatedContentSaveActionIds hint="raw:AddGatedContentSaveActionIds"> | |
| <GatedContentSaveActionId value="{4FB69DA6-EFDE-46B8-8958-CDE99E00BE00}"/> | |
| <GatedContentSaveActionId value="{111BF03D-2831-4C2A-AE9B-2CD00386052C}"/> | |
| <GatedContentSaveActionId value="{6CAAAB20-1677-48D4-A8F3-B7B71E21DB7F}"/> | |
| </GatedContentSaveActionIds> | |
| </processor> | |
| </successAction> | |
| </pipelines> | |
| </sitecore> | |
| </configuration> |
Using Gated Content WFFM Forms with xDB
So now that the client has locked down 90% of their site to users who have given their first-borns we can make use of those forms to identify and update Contacts in xDB. If you want to know more about identifying Contacts in xDB see here.
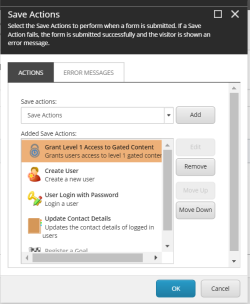
Webforms for Marketers comes with a Save Action to write to xDB which identifies the Contact as well as updates various facets. It’s the Update Contact Details save action. However, there are prerequisites. You need to use the Create User and Login User before the Update Contact Details and in that order. Making sure you edit the Create User and Login User to use the Email address field for the Username.
And that’s it!
That pretty much covers how to achieved Gated Content in Sitecore as well as going as far as levelling that gated access. The module can be found on this link – https://marketplace.sitecore.net/Modules/G/Gated_Content . The full source code is available here – https://github.com/islaytitans/GatedContent .
It’s worth noting the Module is built on 8.1 which has a heavily refactored WFFM compared to earlier versions. If there are enough requests for it I’ll look into implementing it in pre-8.1.
I think the next step of this module is to assign the Gated Access flag against the Contact in xDB opposed to creating a cookie on the browser. But for now a really lean and smart way to achieving a highly desired feature. Any questions or issues give me a shout in the comments or via Twitter.