Sitecore Personalization – Dynamic functionality
In past Quick Start Guides I covered how to get Sitecore Personalization working and how to create dynamic content. This post will outline how to dynamically swap-out components and how Visitor Tags and .NET roles of users can be used to automatically show functionality and content most suited to them.
With recent versions of Sitecore personalization now encompasses components – allowing us to dynamically change the components on the page based on conditions met by the user. In real world terms we are able to automatically swap-out functionality on page for some other functionality that may be more appropriate or enticing for the visitor.
Enable personalization of component design
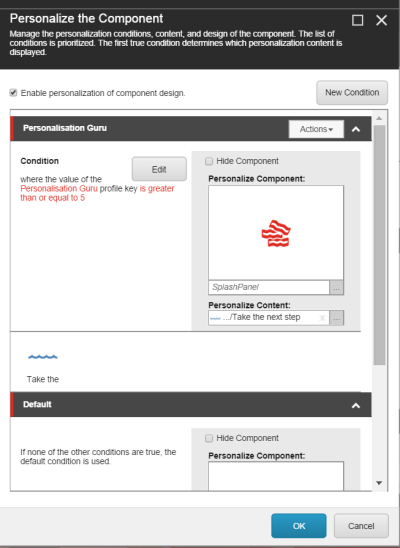
To enable personalization of components find your item in the Content Editor or Experience Editor and through Presentation Details select the component you wish to edit and click Personalize. In the Personalize the Component window check the Enable personalization of component design checkbox just under the header.
With this checked we are now able to swap not only the datasource but the component itself. This is completed by clicking the button below the component icon and choosing another component that we have built.
Now using the rules engine we can set conditions so that when met the functionality and purpose of the page can be changed dynamically.
For example, a restaurant’s homepage may have a component to promote their locations, each location having a button for a user to check-in to say they are there. The Rules Engine can identify users who have checked in and on the next viewing of the homepage the locations component is replaced with a Leave a Review form.
So lets cover Visitor Tags and the rules we can apply to them.
Personalization through Visitor Tags
When a user first visits a site Sitecore creates a visitor record in the Analytics database. This record is then updated with that users actions on the site such as pages viewed, campaigns completed, profile data etc. To link the user to all subsequent visits to the site Sitecore creates two cookies on the user’s browser to uniquely identify them.
This requires very little set-up from a developer, simply have Sitecore Analytics working, as shown in my first post, and add a visitor identification tag to the header of your layout so Sitecore knows to track the session as the visitor is a real user or not if its an robot.
If using webforms add the tag like below
This file contains bidirectional Unicode text that may be interpreted or compiled differently than what appears below. To review, open the file in an editor that reveals hidden Unicode characters.
Learn more about bidirectional Unicode characters
| <sc:VisitorIdentification runat="server" /> |
For MVC you will need to add the following code
This file contains bidirectional Unicode text that may be interpreted or compiled differently than what appears below. To review, open the file in an editor that reveals hidden Unicode characters.
Learn more about bidirectional Unicode characters
| @using Sitecore.Mvc.Analytics.Extensions | |
| @Html.Sitecore().VisitorIdentification() |
Now we are tracking visitors we can use Sitecore API to add a Tag to a user when they submit the check-in button.
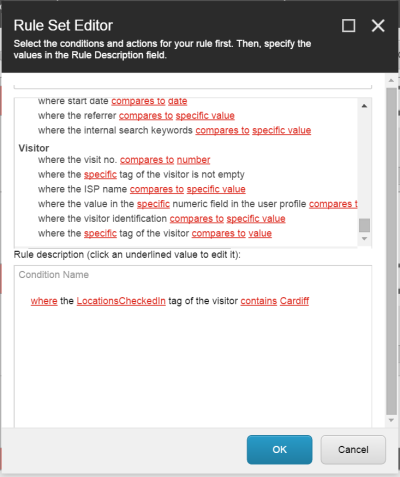
With the Tag to outline the visitor has checked in we can use a new rule in Sitecore’s RuleEngine to look for the Tag and retrieve it’s value to compare it to another value. If the values match the rule is met and the components are switched.
User lands on the home page and ultimately clicking the Locate a restaurant panel.
User clicks Check-in on the Cardiff location. On the next visit to the Homepage, the RulesEngine runs our VisitorTag rule whichis positive and swaps out the Locate a restaurant panel with a Review form for the Cardiff location.
Currently there are only two rules in the Rules Engine relating to Visitor Tags as of Sitecore 8 release 3. One to check if a Tag is present and another to compare its value. There are a lot of things developers could achieve its VisitorTags and the RulesEngine so I am in the process of writing some other useful rules for Profile Tags, such as comparison of Tag Values, Date Functions etc. I’ll update this blog when this is completed and on Sitecore Marketplace.
Anyways, Visitor Tags aren’t the only way to personalize both components and content; completing campaign goals, geographical location and .NET Membership roles can also be used. The latter often comes up in Sitecore forums so I’ll cover that next.
Personalization through User Roles
If your .NET roles exist within Sitecore’s own Membership database or you have a standard .NET Membership database linked to Sitecore via a Membership Provider and a Role Provider you will be able find them in Sitecore’s Role Manager and ultimately use them in personalization.
Membership Roles are a standardised and robust way to group users logically so it makes sense we leverage that to show relevant content and functionality. In the same way that we personalized components earlier we can set the component to be displayed if the user is in a Role.
Components can even be hidden if the user is not logged in or any other condition for that matter.
It may be tempting to give your Content Editors full control over security via this method however it is not substitution a for low level security – using technologies like .NET Membership and Sitecore’s Security Editor and Access Viewer is always the best option for security.
And that’s it!
Personalization of components using Visitor Tags, User Roles and the Rules Engine to dynamically change purpose of a page and the User experience with a little effort and know-how.
A consideration when using Personalization is that indexers will only be able to view the default state of the page. Therefore it is better to think of personalization as a way to enhance your site not the backbone of its functionality.


This post is really nice. I have a doubt on personalization.
How does rules engine identify whether the user is anonymous or the user has any role?obviously we need to have a login functionality. Based on that, we can even identify the role.
LikeLike
Reblogged this on Sitecore Newbie => Code + {};.
LikeLike